Web Design
What is Web Design?
This semester course will focus on the three basic design concepts for a Web site: information design (how to structure information); programming design (getting the site to function): and visual design (what the site will look like). A commonsense approach to design fundamentals will demonstrate how the Web homepage is a practical tool designed to capture and inform an audience. Students will be able to design their own web pages using Macromedia Dreamweaver and add animations to them using Macromedia Flash and Fireworks.
Projects
Project 1 - Virtual Locker
For our first project of the year, we were tasked with personalizing our own virtual lockers. We were asked to put at least ten items inside that represented who we are and what we like. At first this was challenging, as I could not think of specific items that really defined who I was. However, as I began adding items it became easier and easier. I started out by adding pictures of the things that make me happy. I added pictures of sports, my dog, books, a camera, a snowboard, and more. Then, I added pictures of the things most important to me such as my family. Lastly I put in things that reminded me of some of my fondest memories such as the purple flowers that remind me of my grandmother. While this was originally to show Mr. Grillo a little bit of who we are, I ended up getting to know myself a little bit more too in the process. I loved that I was able to express myself in any way I chose to through this project, and I look forward to many more projects in the future.


Project 2 - All About Me Weebly
For our second project in Web Design, the class explored and used an engine called Weebly. We created six different slides, all complete with information about ourselves. The first page, "Home" was just the title, my name, and some images to catch the viewers attention. The second page "About Me" included a description of key information about myself as well as images that represent me. The third page was the "School Page" which had information about my academics and extracurriculars a RBR. Fourth, there was a "Class Page" which explained the concepts of Web Design Class and noted the projects we have done so far. The final informational page was the "Fun" page, in which I used a paragraph along with images to give the viewer an idea of what I do as hobbies and what I do for fun in my free time. Lastly, the "Contact" page on page six gives the viewer the ability to fill out a form to communicate with the site's author.
Project 3 - "How To" Wix Page
For our third project in Web Design, we were tasked with choosing a project to create a tutorial site for. For my project, I chose building a birdhouse. Over quarantine, I built a birdhouse and had lot of fun doing it, not to mention the fun I have had since then watching birds (and the occasional squirrel) go in and out of it. I listed eleven steps, with two per page, on building the birdhouse. In addition to those, I had a materials page as well as a video tutorial page and final product page. Lastly, I added in a standard contact page for any questions or other inquires that may be necessary. I really enjoyed this website assignment because of the fact that we had the freedom to choose any topic we wanted. Also, this site definitely made me more comfortable with using Wix. I was originally hesitant to use Wix because there were many features that I was confused with. However, in completing this project, I was able to explore many of those features and I have realized how cool some of them are after all.
Project 4 - Wix Fan Page
For our fourth project in Web Design, we were tasked with choosing a celebrity and creating a fan page for them. For my choice of celebrity, I decided on Adam Sandler because I find him hysterical and love his movies. Our first page was an introduction, on which I included the title of the website and a few pictures. Next was the "about the celebrity page", which included celebrity stats, occupation, family life, call to fame and any additional interesting facts. The third page was the pictures page, which include candid photos, PR photos and work photos. The fourth page was another media page for videos and included candid videos, work videos, PR videos and additional videos of their work. The fifth and second to last page held previous tour information for the celebrity, which was unfortunately cancelled due to COVID-19. Finally, the last page was a contact page which gave directions to the site viewer on how to contact the artist as well as a contact the site creator form. Overall, I enjoyed this project because I found it to be a lot of fun to research pictures and videos of the celebrity of my choice as well as learning more about them.
Project 5 - Wix Future You Site
For our fifth project in Web Design, we were given the assignment to create a web page about our future selves. We included information that we made up about our career, our higher education, and more. We also made pages about our achievements/awards and places where we can be seen in action such as meet and greets, concerts, shows, etc. Lastly we made a typical contact page at the end of the site. Overall, I enjoyed building this site because the requirements left a lot of room for creativity and I was able to take the site in really any direction I wanted. The only thing I would say that I found hard was finding a template that fit the mold of what I wanted to make of my future me site. I had to modify the backbone of the site a lot more than I would have liked which didn't allow me much time for focusing on the smaller details such as colors, fonts, and other things, so my website ended up being slightly generic.
Project 6 - Pixlr Snow Day Picture
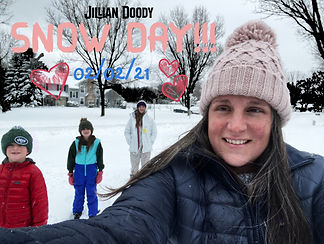
For our sixth project in Web Design, we started a new unit in which we learn the basics of photo shop. We used an application called Pixlr that has many tools and functions that can be used to modify selected images. Since we got a lot of snow that day, our assignment was to go out in the snow with our families or friends and take a picture. Then, when we returned inside, we edited it using Pixlr. We added text that said the date and our names, and then "SNOW DAY!". We changed this text color, size and font to make it visually pleasing on top of our images. I also used the pen tool to draw some designs on my picture and black out the trees in the background to make the snow really pop. Unfortunately, some of the tools were a little confusing and I wasn't yet super familiar with Pixlr so I didn't edit the photo as much as I would've liked. However, overall I though my picture turned out looking really nice and I even printed it out and gave it to my mom who also approved of it.
Project 7 - Pixlr "Wish You Were Here" Picture
For our seventh project in Web Design, we continued our photoshop unit on Pixlr. We had to combine two images into one by choosing a background and then using the lasso tool to cut out a snowman from another image and paste it onto the chosen background. We then added on other fun features using the lasso tool. I added some beachy looking dogs, three whale tails coming out of the water, a beach umbrella, and a beach ball. We also added shadows to make the photo look more realistic. Lastly we added in text saying "wish you were here" and changed the font, color, and size to make it look good. At first, this was a bit challenging and I kept on forgetting the steps, but by the end I got the hang of it and it was super easy. I had a lot of fun with this assignment and I hope to do more like this in the future.

Project 8 - Wix COVID School Debate Site
In our return to site building after a photoshop lesson, we did research to design a website about a very relevant topic today. This topic was the best way to return to education systems during a pandemic. We researched the three plans, hybrid, full remote, and full in person as well as the major pros and cons of each. We were instructed not to use opinion in our work, as it was a somewhat sensitive subject. By the end of our research, we were able to complete a comparison chart about the three methods as well as a page describing RBR's course of action regarding this matter. We then added in a works cited for our last page, giving credit to the sources we used in conducting the research for the other pages. Overall, I somewhat enjoyed this project, but it was not my favorite. This was mostly because I felt that in the end my website turned out pretty generic and it wasn't generic in a way that I could change the design but instead in the way that the content was dry and I felt that I would have a hard time reading this site if it wasn't my own. Nonetheless, I definitely learned a lot about the regulations and difficulties surrounding a return to school during a pandemic and have a much greater respect for the teachers and administrators that have to come up with these plans and try to create a safe and beneficial learning environment for all of their students.
Project 9 - Pixlr Combining People Project
As our third photoshop project of the year, we were assigned two photos. One of these photos was of the young Han Solo and one was of the old Han Solo. Our task was to combine these two pictures to make it appear as if the two Han Solos were standing next to each other. To do this, I used the lasso tool on Pixlr to cut out the young Han Solo and make a copy of him. From there, I was able to switch tabs and paste him next to the old Han Solo. There wasn't enough space in the background for the two to stand naturally without being on top of each other, so I had to take pieces of the background from one side and duplicate them on the other. This created a larger canvas to position the young Han Solo on and looked relatively natural since it was the same scenery as the original picture. I also positioned the young Han Solo so he would cover up any imperfections in the background. The second to last step I took was zooming in on the image and using the eraser tool to get rid of any unwanted background color from the young Han Solo picture. The final step I took was using filters on the photo and playing with the hue and saturation to blend the two photos together. I enjoyed doing this project very much, even though it was hard at times. The only real problem I ran into was missteps with the lasso tool that I couldn't undo and ended up making the young Han Solo strangely shaped. I was however able to fix this by going back and retracing him.

Project 10 - Pixlr Celebrity Meet & Greet Project
Our final project before spring break was an extension of our photoshop lesson. Our assignment was to take a photo of ourselves and combine it with a celebrity photo to make it look like we met them in person. To do this, we used the lasso tool to make a copy of ourselves and paste it into the celebrity photo. We the blended it with filters and erased any traces of other people in the photo which for me was an arm that I just blacked out with the paint tool. I also used the eraser tool to erase some of the unwanted white that carried from my previous background. All in all, I really enjoyed this project and definitely plan on using it to impress my friends in the future.

Project 11 - Pixlr Celebrity Face Swap
For this photoshop project, we used Pixlr to add our face to an existing picture of a celebrity with someone. The original picture already contained a second person, so we used our face to replace the Non-celebrity. The first step I took was taking the picture of myself. I made sure to use the same lighting as the picture to make it look realistic. Then, since I didn't know about the background erase tool at this time, I used the eraser to create a sticker of myself. Then, I positioned it as close to the size of the original person as possible. After that, I cloned the background to cover up any trace of the original person and changed the color makeup of my picture to better blend in.

Project 12 - Pixlr Vacation Project
For our Pixlr Vacation Project, we added our full body to an existing picture of a scenic vacation location. We used our bodies (posed and taken) and added it to a scenery picture. This was a bit harder than I originally imagined because I needed to consider the “Look”of the location used (Shadows, brightness, clothing, etc) I also had to find a picture of myself in snow gear to match with the freezing snowy background. I really enjoyed this project because I think it turned out looking very realistic.

Project 13 - Pixlr "Starring In" Project
For our "starring in" project, we were to find a movie scene and replace the main actor with ourselves. We had to pose and have someone take a picture of us so that our full body would be in the frame. Once in the picture, we cloned out the original people so you do not see them. I also ended up having to adjust the color settings of my picture to adjust to the quality of the movie.
.jpg)
Project 14 - Cartoons in Real Life Project
For this photoshop project, we used Pixlr to combine a cartoon with a real-life background. I chose to take the original Spongebob and photoshop him into a scene from the Spongebob musical. To do this, I found a picture of Spongebob and a picture from the musical that would go well together and make it look as if the cartoon was truly interacting with the realistic background. Once I found the pictures I wanted to use, I used BG erase and then positioned the cartoon Spongebob on his new background. When I realized he looked too short, I took a picture of Gary and positioned Spongebob to stand on top of him. I then added shadows under his feet. Finally, since there was another image in the space Spongebob would occupy, I cloned the background to make it blank.
.jpg)
Project 15 - Clone Body Project
As an introduction to our face clone project, we were assigned a project in which we had to "clone ourselves" or in other words combine pictures of ourselves in the same frame to create the illusion that there are multiple of us. To do this, I used the background erase software as well as the cloning tool to smooth the background. I posed in different places around my kitchen for the pictures so that it appeared that multiple of myself were working together completing different tasks.
%20(1).jpg)
Project 16 - Face Clone Project
Project 17 - Letter Off Title Project
As one of our final projects of the year, we were assigned the "Letter off Title" project, in which we used the photoshop software of Pixlr to change the title of a movie or show and adjust the background accordingly. I used the movie title Star Wars as my inspiration, changing it to Star "Chores". To change the title letters, I found a star wars font online, downloaded it, then uploaded it to the image, using the glow feature to make it big enough to cover the original title. To coordinate with the new title, I covered up the lightsabers in the photo with cleaning supplies. Looking back, this project had many moving parts, so it did take me a while, but I think it was worth it in the end because my movie cover ended up looking very cool and realistic.

Project 18 - Choice Project (Combing People)
For our last project of the year, we were tasked with recreating any one of our photoshop assignments we have completed throughout this year. I chose the combining people assignment since it was the first real photoshop I had done and I thought there was much room for improvement. The original assignment involved using Pixlr to stage the old Han Solo next to the new one, like they were standing together. For my most recent project, I used this as inspiration and staged the old Willy Wonka next to the new one. To do this, I used the background erase software, cloned the background to cover any spots, and finally adjusted the new image to fit and match its new backdrop. Overall, I enjoyed this project because I was able to put it side by side with my Han Solo project when it was finished and see the true improvement I have made since we first started the photoshop unit.
